How To

Dia de los Muertos Makeup Tutorial

calavera hero
calavera hero

Counting the days until my favorite holiday Dia de los Muertos, and as a warm up to this year's celebration I've hosted a couple workshops in costume creation and sugar skull making.  I hate to leave my out of town friends and fans out of the fun- and at the compelling request of Crime Spree Carol, it seemed like I ought to post a quick tutorial on calavara creation.  I won't say that she threatened me into doing this, but now that the blog post is up, I'll assume she's destroyed all negatives of the incriminating 8' x 10' photos that arrived in last week's mail.

supplies
supplies

So Carol, and the rest of you, before we get to the disguise part, you'll want to  gather up supplies- The clown white grease paint was a purchase from Goodwill for $1.49, almost a steal!  I got the black and glitter liquid eyeliners, mascara and fake eyelashes from the drug store and black face paint and body art kit from the craft store.  In all the gear set me back about $30 but I'll be able to do a whole posse of folks with this so it was a good investment.  You might also want to get white face powder and tiny gems to add at the end for extra bling.

step1
step1

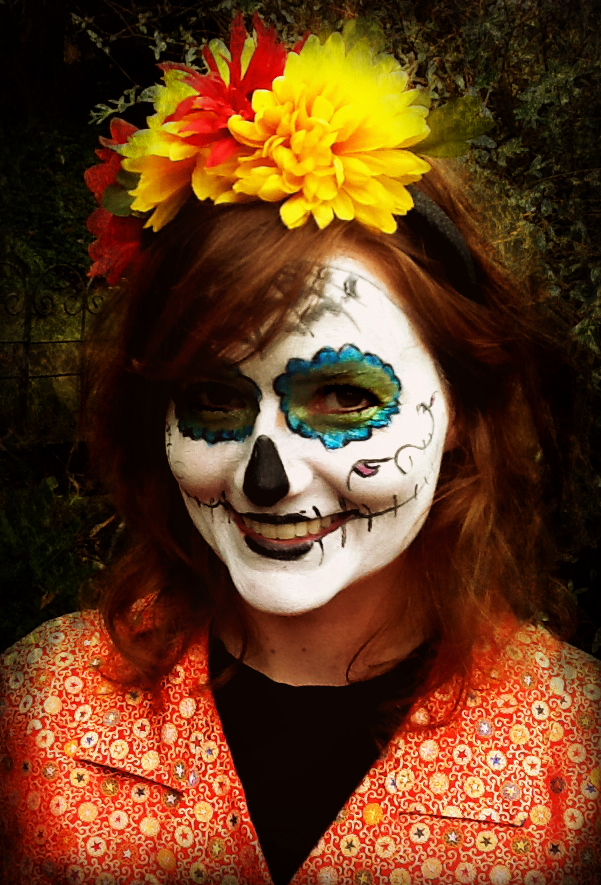
My friend Laura was kind enough to pose for the photos, I think Crime Spree Carol may have something on her as well, after this we'll consider all debts paid in full.  In the 1st step I covered Laura's face in the grease paint with a small sponge.  I left large areas around her eyes and tip of nose free.  If you'd like the makeup to set you can brush on the white face powder next, it will also help the other colors go on smoothly on the top.

step2
step2

Next, I applied face paint to the eye area, you could also use a dark eye shadow for this step but I liked having the ability to layer and add lots of color to the flower shapes.

step3
step3

In dark blue face paint I created a flower shape around Laura's eyes

step4
step4

I filled in the flower petals in a lighter blue and blended them into the green circles

step5
step5

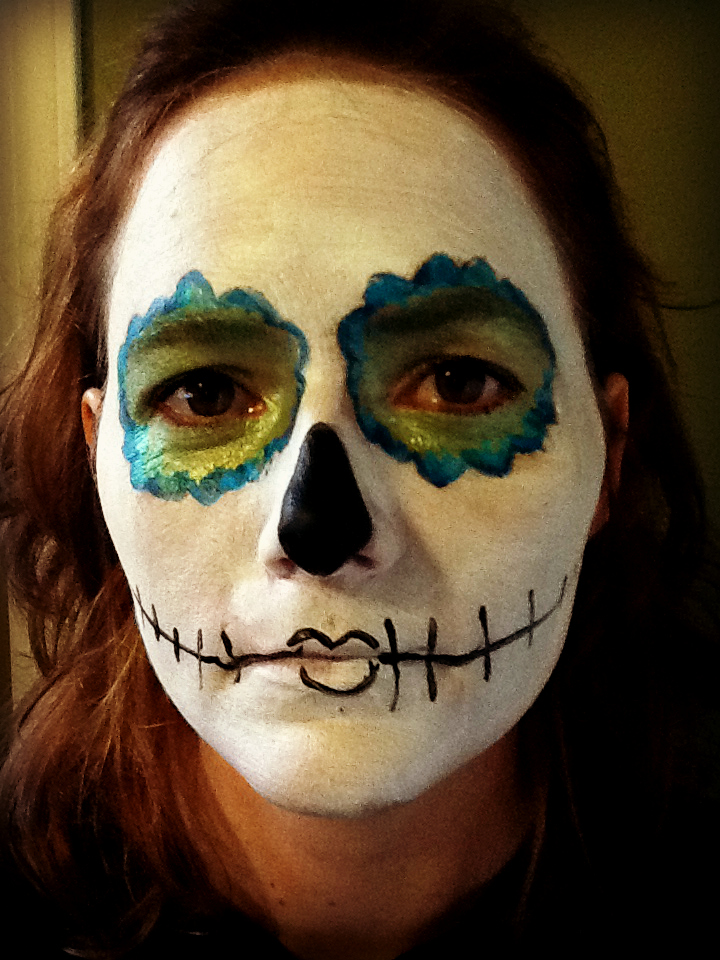
Using the black liquid eyeliner I filled in Laura's nose and made the outlines for her mouth

step6
step6

I used the black eyeliner again to draw a spider web on her forehead and fill in her lips.  I also used it on her eyes in the waterline and outlined her upper eyelid

step7
step7

To give the web definition, I added a second line in black grease pencil.  This is a great tool to use when doing skeletons for guys especially in the cheek areas and to add lip effects.

step10
step10

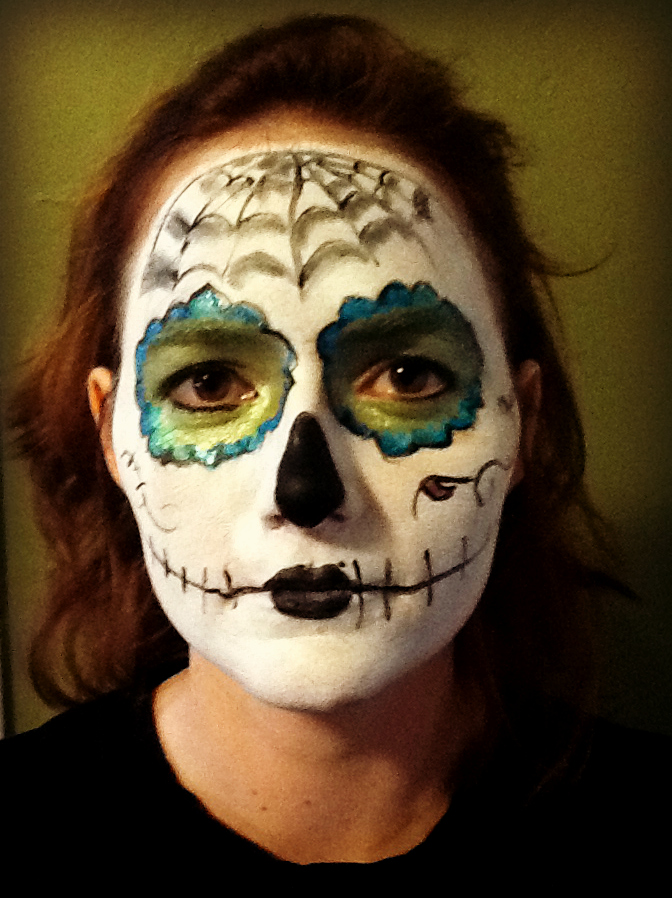
For the last few steps, I traced around the flower eyes in black liquid liner and added glitter eyeliner highlights.  I also drew shapes on her cheeks and filled them in with face paint.  From here you could add false eyelashes and sequins or small gems as well

calavera flirts
calavera flirts

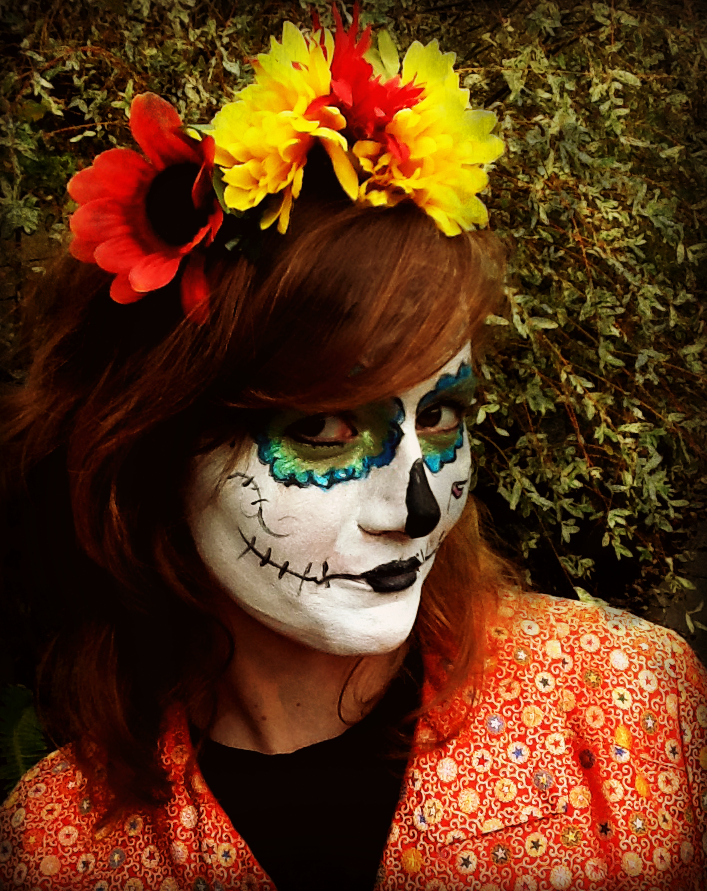
Top the whole thing off with a saucy headdress of flowers and don't forget the little people!

kidaveras
kidaveras

Facinators, you wear them on your head

50 Shades of Grey Facinator

Well summer is in full swing, it's wedding and horse racing season which means two things, classy ladies are going on Champagne benders and sticking silly things on their heads while running willy nilly to the finish line. With these parameters, I of course refuse to be left out, and had to put my own twist on the chapeau phenomenon by making a series of themed facinators to wear at events I've got coming up.

Some of my men friends have never heard of facinators, so I'll take a moment to explain- They are fancy bits of lace, ribbon and do-dads that you wear on your head, similar to a hat, but smaller.  Their geographical placement, above the belt line, might make them a bit more disappointing than they sound at first, but bear with me, with the right theme in mind, we can spice them right back up to being interesting.

I've made a few of these literary inspired accessories now so putting together the "50 Shades of Grey Facinator" was so easy, I could have done it with one hand tied behind my my back.  (While rolling my eyes and chewing on my bottom lip).  Seriously, handcuffs on your head is hot, and not hard to do.  I opted to use the toy version of the shackles both for safety's sake and they are a hell of a lot lighter and easier to attach with a glue gun.  I actually got all the supplies to make the facinators from the Dollar Store, with the exception of the paint chips which I stealthily pocketed while at the paint shop.  I think they actually give them away, but I like to feel sneaky even when I'm not doing anything wrong (except for not wearing underwear).

Supplies:

Plastic headband

Plastic netting or fancy tuile

50 paint chips

Plastic handcuffs

So to make: Cut a produce bag into a 8x 12"  strip, scrunch one end of your "veil" together and attach to a plastic headband with hot glue.  Do this over a newspaper because it's going to make a drippy mess and since your veil is made of plastic, it's going to melt a little bit.  One trick is to put a bead of glue onto the headband and let it cool for about 20 seconds before pressing the netting down into it, and of course be careful, as it's going to be hot.

Fan your chips and glue one on top of the other, glue pain chip rosette onto headband and cuffs on top of that

Open a bottle of expensive Chablis and pick up the phone, maybe Christian is free for a booty call

Vegas Facinators
Vegas Facinators

 If he's not around you can always treat yourself to more crafting, it's almost as much fun as kinky sex with a neurotic billionaire.  I had a hoot making a whole horde of facinators for my upcoming trip to Las Vegas.  For some I went for the straight up gambeling theme, but I wanted to do something for my book signing at The Mob Museum of Las Vegas on the 30th.  I am super stoked to check the museum out, the exhibits sound spectacular, looking at both sides of the crime history, the criminal element and the law enforcement officers who fought to bring them to justice.  This duality inspired me to make two special facinators, one for the gangsters with a bottle of bootleg gin and one for Johnny Law with iconic shades and a fancy pants badge, that is probably fooling no-one.

Vegas Facinator collage2

Now you might be looking at these hats and think to yourself that Ms. Demeanor has finally taken crafting too far, no one would wear something so ridiculous on their heads, but friend, you'd be wrong and I'd like to point you to the most excellent blog post on Go Fug Yourself  highlighting the haberdashery hijinks at the Royal Ascot this weekend, where society dames wore two teared bird houses and gargantuan flowers on their noggins.  The outfits for Lady's Day have gotten so out of hand that the Ascot officials have laid down the law this year, all together banning facinators in the royal box (no innuendo there!) but they still allow big ass hats.  I remain amused and inspired.

Bring Out Your Easter Zombie Crafts

zombie bunnies
zombie bunnies

Technically this isn't a criminal craft, but zombies so frequently walk (lurch) that fine line that crooks and other miscreants get lumped into that featuring them on my blog doesn't feel like cheating.  And while pairing zombies with a fuzzy pastel holiday might not be for everyone, at my house we find a little sprinkling of mutant monsters adds a bit of joie de vivre to almost any occasion,  like a dash of Tobasco sauce for the psyche. One of my favorite on-line stores, Think Geek featured zombie bunnies but they sold out before I could get my order in.  This gave me the perfect excuse to make my own.  Since my tableaux featured bunnies in mid feed I bought a few that were already broken and the store gave me a discount.  Zombies=thrifty. To make this craft you'll need:

Store bought bunnies one larger than the others-

1 bag white chocolate chips

New, clean paint brush

Green and red and black gel or powdered food coloring (NOT liquid)

1 Cup powdered sugar

Red hots

Oreos

IMG_8468
IMG_8468

To make:

Set a small pot of water to simmer on the stove- put the chips into a metal or glass mixing bowl that this slightly larger than your pot and place on top.  What you are creating is a double boiler effect that will evenly melt your chocolate at a consistent low heat. Keep an eye on your chips, once they begin to melt you'll want to grab a hot pad to hold your bowl and whisk gently with your other hand- be ready to pull this off the heat if it starts happening to quickly.  Add your green food coloring-  This step is really important - DO NOT USE A LIQUID FOOD DYE, it will seize up your chocolate and you'll end up with a big green lump.

Once your color is mixed in, take a paint brush and coat the exterior of your bunny, if the chocolate gets too cool and hard you can always put it back over the simmering water. Let chocolate bunny cool completely. Break a couple bunnies in half or large pieces and dip the edges into the green chocolate

Next you'll be mixing up your icing- add water a few drops at a time to your powdered sugar until you have a slightly runny consistency, not as stiff as tooth paste instead, comparable to maple syrup.  Add red food coloring to the icing.  For this layer you'll be going for more of a splatter effect.  Dip your brush in the warm icing and flick it across the bunny.

IMG_8472
IMG_8472

I used red hots for the zombie eyes, you can dip these in either the chocolate or the icing to stick them to the bunnies.  From here on you'll be setting the scene- Toss your cookies into the food processor and blend at high speed or if you're old fashioned you can put them into a bag and break them up with a rolling pin.  Dip the base of your big bunny into the warm chocolate and stick him on a serving platter.  The extra chocolate layer will keep him from toppling over.

Spread the cookie mix on the serving platter and add bunny bits.  I went a bit overboard on this part- When I tried making this the 1st time I forgot about liquid dye in chocolate and my 1st batch was a lump.  Ever the inspired crafter, I took the rejects and shaped them into egg form, drizzled them with more chocolate and the red icing and added red hot eyes.

I've been collecting egg shells for cascarones and used some of these to nest the zombie eggs.  So here's the absolute best part about this craft- I've still got a few days until Easter and if I sneak downstairs and start eating these bunnies before anyone actually sees them, no one will be the wiser- the more I eat, the more authentic it's going to look. So brilliant.

IMG_8523
IMG_8523
IMG_8480
IMG_8480

How to have yourself an Angry little Christmas

wreath1
wreath1

Well friends, it's that time of year again, when my ice cold heart warms slightly and in an eggnog fueled stupor, I indulge in a little cute craft making.

What can I say.  I love Angry Birds.  I've never played it, but I love it.  I love that it is on my phone and I can give the children my phone and have twenty minutes of quiet mommy time. I love that it's a game about throwing pigs, express bacon, what could be better?  I like that it is "angry" not, plain old "pig toss" or "fussy birds"  there is unabashed emotion here, cartoon characters not afraid to live out their inner id.  They are angry and I can totally identify with that.  If I wasn't the "Criminal Crafter" I might be the "Angry Crafter"  because that suits me pretty well, except for right now, as I'm the "Deeply Amused and Pleased With Herself Crafter" as every time I look across the room and see my new wreath, I crack up, as the little beady eyes are glaring back at me.

wreath2
wreath2

The whole project was a bit of a whim.  I was at the thrift store last week and found a giant bag of small feathered birds for $3.  Seeing anything with a bag over it's head makes me slightly uncomfortable, so I bought them just to let the poor fake beasties out of confinement.

I gave them the usual treatment- anything that makes it's way into my house and isn't a food object, eventually will get glue gunned to something else frequently being covered in glitter 1st.  I knew school glue and feathers probably wouldn't be a good match so I went with a light coat of spray adhesive and liberally applied the red glitter.

wreath8
wreath8

My son acted as facial consultant, my prototype birds really weren't angry enough.  I tried calling them names and mocking them, which didn't really work, so I just drew thicker eyebrows on the next birds and that seemed to work out just fine.

I had a grape vine wreath in the basement which gussied up quick with a thick coat of spray paint and I made the pig eyes and ears out of card-stock.  I've a number of birds left over so we'll be handing them off to special friends as Christmas gifts, which is perfect since I ate all the rum balls.